This enables you to streamline the document signing process by creating templates that automatically incorporate predefined fields and formats. This eliminates the need to manually add the same fields to each document, enhancing efficiency and consistency. One effective method to set up these templates is by embedding specific tags directly into your base documents using your preferred text editing tools, such as Microsoft Word, Google Docs, PowerPoint, or PDF editors.
Understanding Template Tags
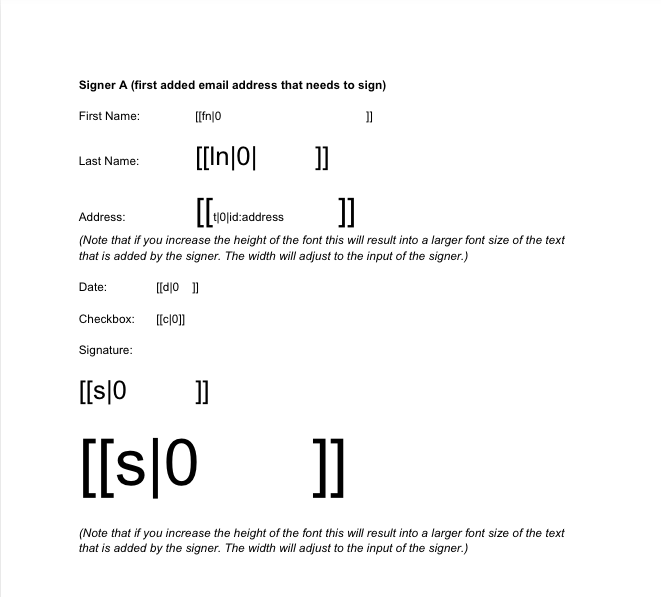
Template tags are placeholders that recognizes and converts into interactive fields during the document preparation phase. Each tag specifies the type of field and assigns it to a particular signer. The general format of a tag is [[field_type|signer_number]], where:
field_type: Denotes the type of field (e.g., text, date, signature).signer_number: Indicates the signer to whom the field is assigned.
It's important to note that the signer number 0 is always reserved for the sender. Other numbers correspond to additional signers. For instance, [[t|1]] represents a text field assigned to signer 1.
Commonly Used Tags
Here are some standard tags you can use:
- Text Field:
[[t|0]] - Date Field:
[[d|0]] - Checkbox Field:
[[c|0]] - Signature Field:
[[s|0]] - Stamp Field:
[[st|0]] - Initials Field:
[[i|0]] - Name Field:
[[n|0]] - First Name Field:
[[fn|0]] - Last Name Field:
[[ln|0]] - Company Field:
[[co|0]] - Email Field:
[[e|0]] - Title Field:
[[ti|0]] - Attachment Field:
[[a|0]]
Steps to Create a Template Using Tags
-
Insert Tags: Open your base document in your chosen text editor and add the appropriate tags where you want fields to appear.
-
Adjust Font Size: Select each tag and set the desired font size to define the field's size.
-
Hide Tags: To prevent tags from being visible in the final document, change their font color to white.
-
Maintain Spacing: Ensure there's adequate space between tags, preferably by using the Enter key or adjusting line height.
-
Organize Tags: For optimal results, place tags within a table or apply a different text style to distinguish them from the main content.
-
Test the Template: Before sending, thoroughly test the template to confirm that all fields function as intended.
Important Considerations
-
Signing Order: You cannot set the signing order within the template tags. This must be configured during the document preparation phase.
-
Field Resizing: Adjust the size of text, date, and signature fields by modifying the font size and adding spaces as needed.
-
Unsupported Fields: Currently, radio buttons and dropdown fields are not supported as template tags.
By following these guidelines, you can create efficient and reusable templates ensuring a consistent and streamlined experience for all your document signing needs.